
UpRival's Link Tracker
Understanding what tracking type to choose when setting up your placements.
UpRival is able to serve landing pages, as well as ads. The landing page HTML code can be hosted and served within UpRival, or you can use a 3rd party URL. All of the targeting and reporting features of the ad server are also in the link tracker. You can target landing pages by SubID, browser, GEO, IP address, device type, ISP, IP type, or proxy IP address. You can also set rotation weights on landing pages and landing page groups.
You must first have a publisher in place to use this feature. For information on how to create a publisher, see the following article: Create Publisher. When creating a new placement, select “Link Tracker” as the tracking type.
Then, create landing page (LP) groups as necessary. LP groups will allow you to set targeting on the group level if you have landing pages or offers that meet specific conditions. When using targeting make sure to create an inverse target as well, to prevent any errors from not having any ads or groups to display.
There are two options when creating a new landing page: Landing Page URL and Landing Page HTML.
Landing Page URL: A landing page URL is a site that is hosted on another domain.
Landing Page HTML: A landing page HTML is a page where the code is hosted on the UpRival content display network.

You are able to create a landing page URL using the following steps:
- Click the Create Button
- Choose Landing page URL from the drop down menu
- Name the page
- Set the destination URL – this would be the URL of your sales page or offer
- Set the distribution weight, cost metric, and cost weight

Note: Multiple landing pages can be created and will rotate.
You can host landing pages within UpRival as well. This is an advanced feature where having a little technical knowledge of HTML code will be helpful.
You can host your landing page in UpRival by using the following steps:

- Click the Create Button
- Choose Landing page HTML from the drop down menu
- Name the page
- Copy and paste the index file of your page to the HTML Code box
- Add any click tag macros or advanced macros to your HTML code (Learn more about setting up advanced macros here)
- Set the distribution weight, cost metric, and cost weight

You can also use the Upload Zip File Option.
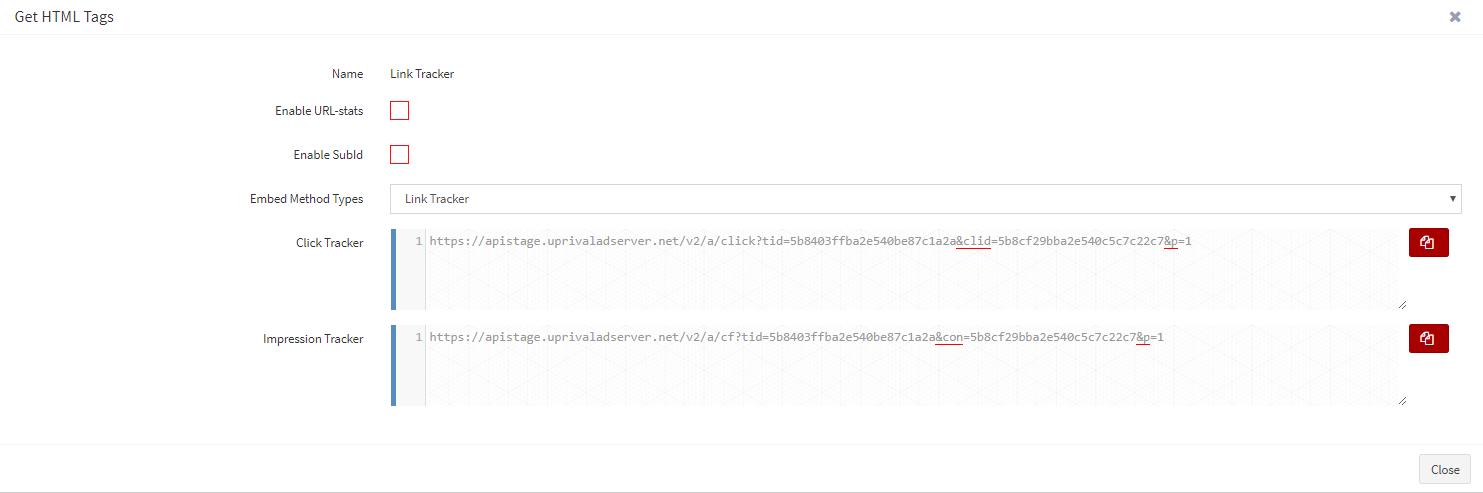
With the landing page created, you can get the click tag and place it on your sales page or as the destination URL of your ad in UpRival, or 3rd party traffic sources like Facebook, AdWords, or content ad networks. Your click tracker is the redirect link that sends people to your landing page or offer, and if multiple landing pages or LP groups were created, then the same link tracker will rotate through the LPs. To get the tag, click on the Get Tag button. There are two tag options: click tracker and impression tracker.
Click Tracker: This is the destination URL that will click through to your landing page based on the settings you have in your link tracker placement.
Impression Tracker: Some platforms allow you to set an impression tracker to track ad impressions to a third party system like UpRival.
If using the link tracker on your sales page, the click tracker should be the URL in your a href tag:
i.e. <a href=”[CLICK TRACKER URL]”>Insert clickable text or image here</a>
An impression tracker should be placed as an image pixel on your sales page, if needed, to track page impressions:
i.e. <img src=”[IMPRESSION TRACKER URL]” style=”display: none;” />
Now you can manage landing pages as easily as you manage your ads in UpRival. The click tracker URL can also be used as the destination URL in any UpRival ad, allowing you to test ads and landing pages together.